가. SSL인증을 위한 OpenSSL과 CA 인증서 만들기
1. SSL/TLS과 인증서
SSL(Secure Socket Layer)/ TLS(Transport Layer Security)는 네트웍 전송 계층의 암호화를 통해 통신하는 규약, 대표적으로 HTTP가 SSL/TLS를 이용하여 HTTPS(HTTP over TLS)를 제공하고 있으며, SNMP, FTP 등 다양한 인터넷 프로토콜에서 쓰이고 있습니다.
통신을 위해서는 상호간 인증서를 통해서 데이터를 암/복호화를 할수가 있습니다. 주로 웹서비스(HTTPS)와 같이 불특정 다수의 사용자를 위해 공인 아이피를 통해 서비스를 하는 경우는 공인 SSL 인증서(VeriSign,Thawte, GeoTrust 등)를 발급받아 웹서버에 적용해야 합니다.
특정 서비스나 B2B 사업자끼리 지정된 IP간의 통신할 경우는 사설 인증서를 만들어 TLS/SSL 통신을 할수가 있습니다.
발급된 SSL 인증서는 apache httpd 등의 Web Server 에 설치하여 https 서비스를 제공할 수 있다.
2. SSL 인증서 발급 절차
- 개인키(Private Key) 생성
- CSR(Certificate Signing Request) 생성
- 인증서 발급 신청 제출
- 인증서 발급 완료
- 인증서를 서버에 설치 적용 - 신규,갱신,재발급,도메인추가
- 서버 정상 적용 완료 테스트
- 웹페이지에 https:// 링크 적용
1. 개인 키(PrivateKey)를 작성합니다.
$ openssl genrsa -aes256 -passout pass:password -out example.private.key 2048
$ openssl req -new -newkey rsa:2048 -nodes -keyout <개인키이름>.key -out <인증요청서이름>.csr
2. CSR(Certificate Signing Request) 생성
$ openssl x509 -req -days 365 -in <인증요청서이름>.csr -signkey <개인키이름>.key -out <생성할인증서이름>.crt
$ openssl req -new -key private.key -out out.csr -subj "/C=KR/ST=Seoul/L=Gang-Nam/O=SomeCompany/OU=Dev Team/CN=example.com"
아래와 같은 정보를 함께 입력 하여야 합니다.
[CSR 주요 구성 정보]
| Country | KR | 국가코드 |
| State / Province | Seoul | 시/도의 전체이름 |
| Locality | Gang-Nam | 시/군/구 등의 이름 |
| Organization | SomeCompany, OOO inc. xxx com. | 기관명 / 회사이름 |
| Organization Unit | Dev Team | 부서명 (원하시는 부서명으로 기입) |
| Common Name | example.com sub.example.com *.example.com |
SSL인증서를 설치할 서버의 Full Domain (FQDN 도메인 형식) |
* 인증서 발급 요청서 작성
Enter pass phrase for pri.kery: (개인키 패스워드 입력)
Loading 'screen' into random state - done
You are about to be asked to enter information that will be incorporatedinto your certificate request.
What you are about to enter is what is called a Distinguished Name or a DN.There are quite a few fields but you can leave some blankFor some fields there will be a default value,If you enter '.', the field will be left blank.
-----
Country Name (2 letter code) [AU]:KR (국가코드 C)
State or Province Name (full name) [Some-State]:Seoul (시,도 ST)
Locality Name (eg, city) []:Gang-Nam (구,군 L)
Organization Name (eg, company) [Internet Widgits Pty Ltd]:SomeCompany(기관명 O)
Organizational Unit Name (eg, section) []:Dev Team (조직명 OU)
Common Name (eg, YOUR name) []:example.com (도메인명 CN)
Email Address []:webmaster@example.com (관리자용 이메일)
Please enter the following 'extra' attributesto be sent with your certificate request
A challenge password []: enter (설정 X)
An optional company name []: enter (설정 X)
3. 아래 사이트에서 인증서 발급신청 제출
- Sectigo PositiveSSL (국내 최저가 수준 SSL 인증서)
- Sectigo PositiveSSL Wildcard (국내 최저가 수준 와일드카드 인증서)
- Thawte SSL 123 (국내 최저가 수준 SSL 인증서)
- GeoTrust QuickSSL Premium (국내 최저가 수준 SSL 인증서)
- RapidSSL Standard (국내 최저가 수준 SSL 인증서)
- Sectigo/RapidSSL Free Trial 인증서
4. 인증서 발급 완료 파일 확인 및 인증서 체인 만들기
- 인증서를 받게 되면 기본 도메인에 대한 인증서 그리고 chain 인증서 / root 인증서 3가지가 존재하게 된다
apache의 경우 chain 및 root 인증서를 경로 지정해서 등록 할 수 있지만 nginx는 3개의 인증서 파일을 1개의 파일로 통합하셔 사용하면 됩니다.
domain_xxxxx.crt -> 도메인 인증서
DigiCertRoot2.crt.cer -> root 인증서
EncryptionEverywhereDVCA.crt -> Chain 인증서
반드시 <서버 인증서> <체인 1/2 인증서> <루트 인증서> 순서대로 통합 해야 합니다.
$ cat domain_xxxxx.crt ca-chain-bundle.cer > example.domain.cer
$ cat domain_xxxxx.crt 체인인증서(각각).crt 루트인증서.crt.cer > example.domain.cer
$ cat domain_xxxxx.crt DigiCertRoot2.crt.cer EncryptionEverywhereDVCA.crt > example.domain.cer
만약 nginx를 재기동 하면 계속 패스워드를 입력 해야 한다면 다음과 같이 패스워드를 재설정합니다.
$ cp example.private.key example.private.key.ssl
$ openssl rsa -in example.private.key.ssl -out example.private.key
Enter pass phrase for example.private.key.ssl:
writing RSA key
나. Nignx와 Tomcat SSL인증 연동 하기
5. 인증서 웹서버에 설치 (nginx stop and start )
기존 http(80)을 https(443)으로 포워딩(리다이렉션) 하도록 수정하여 설정을 수정합니다.
# Load Balancing
upstream tomcat-server {
least_conn;
server 10.20.30.1:8080 max_fails=3 fail_timeout=10s;
server 10.20.30.2:8080 max_fails=3 fail_timeout=10s;
}
server {
listen 80;
server_name www.example.com example.com;
rewrite ^ https://$server_name:443?request_uri? permanent;
}
server {
listen 443;
server_name www.example.com example.com;
charset utf-8;
access_log /var/log/nginx/access-ssl.log;
error_log /var/log/nginx/error-ssl.log;
ssl on; #ssl사용
ssl_session_timeout 5m;
#ssl_protocols SSLv2 SSLv3 TLSv1; # 보안 취약점으로 TLS1.2이상 사용하게 됩니다.
ssl_protocols TLSv1.2 TLSv1.3;
ssl_prefer_server_ciphers on;
ssl_ciphers ECDHE-ECDSA-AES128-GCM-SHA256:ECDHE-RSA-AES128-GCM-SHA256:ECDHE-ECDSA-CHACHA20-POLY1305:ECDHE-RSA-CHACHA20-POLY1
305:kEDH+AESGCM:ECDHE-ECDSA-AES128-SHA256:ECDHE-RSA-AES128-SHA256:ECDHE-ECDSA-AES128-SHA:ECDHE-RSA-AES128-SHA:ECDHE-ECDSA-DES-CBC3-S
HA:AES128-GCM-SHA256:AES128-SHA256:AES128-SHA:SRP-RSA-AES-128-CBC-SHA:DES-CBC3-SHA:!aNULL:!eNULL:!EXPORT:!DES:!RC4:!MD5:!PSK:!aECDH:
!EDH-DSS-DES-CBC3-SHA:!EDH-RSA-DES-CBC3-SHA:!KRB5-DES-CBC3-SHA:!DHE-RSA-AES256-GCM-SHA384:!DHE-RSA-AES128-GCM-SHA256;
ssl_certificate_key /etc/nginx/ssl/example.private.key; #생성된 개인키
ssl_certificate /etc/nginx/ssl/example.domain.cer; #생성된 체인 인증서
ssl_session_cache shared:SSL:10m;
location / {
proxy_redirect off;
proxy_set_header Host $http_host;
proxy_set_header X-Real-IP $remote_addr;
proxy_set_header X-Forwarded-For $proxy_add_x_forwarded_for;
proxy_set_header X-Scheme $scheme;
proxy_pass https://tomcat-server;
}
}
6. Nginx 웹서버 재기동 (nginx stop and start )
$ nginx -s stop
$ nginx
or systemctl nginx start
or service nginx reload
7. tomcat 서버도 수정 ( Configure server.xml of Tomcat )
웹서버의 scheme="https" proxyPort="443" 만 수정해도 됩니다.
(추가 사항으로 Tomcat APR Listener를 활성화하는: AprLifecycleListener .... SSLEngine="on"은 안해도 됩니다. )
...
<Server port="8005" shutdown="SHUTDOWN">
<Listener className="org.apache.catalina.core.AprLifecycleListener" SSLEngine="on" />
...
<Service name="Catalina">
<Connector port="8080" protocol="HTTP/1.1"
connectionTimeout="20000"
redirectPort="8443" proxyPort="443"proxyName="localhost"
scheme="https" />
/>
<Connector protocol="AJP/1.3"
....
SSLEngine="on"
....
/>
...
</Server>
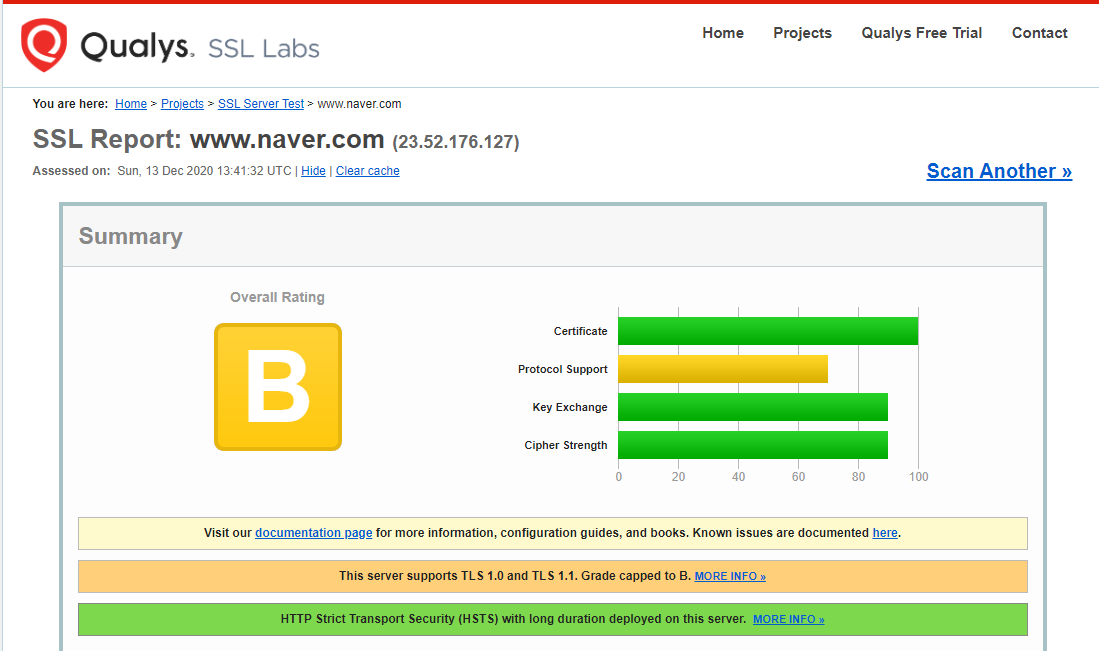
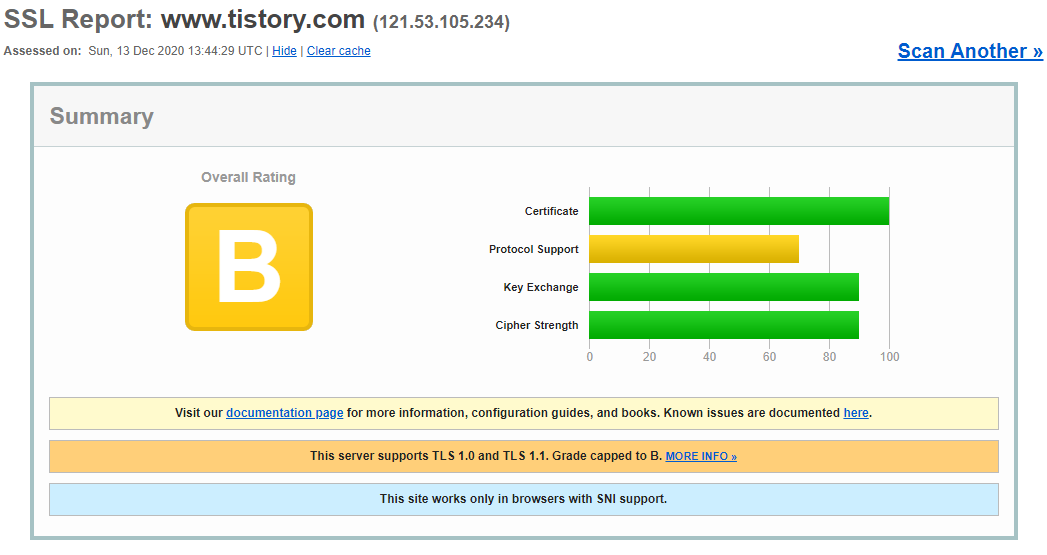
최종 확인
https://www.ssllabs.com/ssltest/index.html 사이트에서 체크 등급을 확인 합니다.
이상으로 다음과 같은 설정을 마무리 했습니다.

참고 : OPenSSL/TLS 1부- SSL(Secure Socket Layer) 보안 소켓 계층 이해 Secure-Sockets-Layer
SSL/TLS 1부- SSL(Secure Socket Layer) 보안 소켓 계층 이해
SSL-1부- SSL(Secure Socket Layer) 보안 소켓 계층 이해 1. SSL/TLS 의 개요 보안통신을 위해서 양쪽 통신노드 간의 암호화 통신을 위한 별도의 암호화 체계가 필요 했습니다. SSL/TLS는, 브라우저 같은..
couplewith.tistory.com
참고 : Nginx와 Tomcat SSL : configuring-nginx-for-use-with-tomcat-and-ssl
Configuring nginx for use with Tomcat and SSL
I have Googled and looked at various sample SSL configurations and it seems like I've got things set up right, but there are two problems: When I load https://mysite.com, the lock that should appe...
serverfault.com


* 사용하지 않거나 취약한 부분들은 위의 환경 설정 "ssl_ciphers" 처럼 제거를 하면됩니다.
'InfraPlatform' 카테고리의 다른 글
| [꿀팁] 고성능 Nginx를위한 튜닝 - (2) 프로세스 처리량 늘리기 (0) | 2020.12.27 |
|---|---|
| [꿀팁] grubby를 이용한 grub2 커널 부팅 순서 변경하기 (0) | 2020.12.26 |
| OpenSSL/TLS 1부- SSL(Secure Socket Layer) 보안 소켓 계층 이해 (0) | 2020.12.13 |
| [리눅스 꿀팁] fdisk 사용하기 (전문가모드) (0) | 2020.11.30 |
| [셀스크립트 응용] ICONV 을 이용한 파일 인코딩(Encoding) (0) | 2020.11.29 |
| [셀스크립트 응용] ICONV와 SED 를 활용하여 파일의 문자셋(charset)을 변환 하는 방법 (0) | 2020.11.29 |
| [꿀팁] 리눅스 - fuser명령 사용법과 디스크 강제해제 unmount (0) | 2020.11.16 |